|
|
| Register | Forums | Blogs | Today's Posts | Search | Donate |
 |
 |
 |
|
#1
 12-31-2011, 03:33 PM
|
|||||
|
|||||
|
My apologies, in advance, to anyone who really knows the correct to do this.
You might wonder, with the easy availability of "drop-in" bushings, why would anyone bother to fit one themselves. Manufacturing tolerances are really good, these days. Why go through all that bother? Maybe I'm just a bit soft in the head. After all, how hard could it be? I think bushings are a lot like springs--meant to be replaced as a normal wear item. Sure, the gun keeps working, but once a bushing starts to wear you will lose accuracy. If the bushing is loose, there's nothing to consistently hold the front of the barrel in place. Since my new CBOB had a rather generous group size and a somewhat loose bushing, I decided to replace it. Since I was too cheap to pay someone else I had to do it myself. The first step to fitting a new bushing, naturally, is to decide which bushing you want to use. There are several styles--thich flange, thin flange, traditional contour, etc. I chose the "melt" contour with a thick flange from EGW. The "melt" contour has a unique shape which mimics the slide, which makes sisassembly and reassembly of the pistol a bit odd...you can't use the traditional turn plug, release spring, etc. method. No matter how you turn it, the melt shape traps the spring plunger. The only way to disassemble and reassemble the pistol is to use the slide stop to remove and replace the slide as a complete assembly (and you'd better keep your hand curled around the spring while you do that!). In any event, the first step is to fit the bushing to the barrel. The way to do this is with careful removal of material from the bushing. I've seen YouTube shenanigans involving dremels and so forth. That may be one way, but I don't believe that's the best way. I used an adjustable hand reamer, taking light cuts until the front of the barrel could *just barely* be pushed into position. Next, I had to work out a way to make cuts on the outside of the bushing, exactly concentric to the barrel bore. Ideally, I would have used an expanding mandrel on my lathe. But, wouldn't you know it, I didn't have an expanding mandrel on hand (I need to rectify that, I think). So, after a bit of poking around the scrap box and thinking about making a mandrel, I had an idea. It probably wasn't a very good idea, but in the end, it worked. I hit on the idea of closing my chuck jaws and trapping the bushing between the face of the jaws and a live-center in the tail stock. It wasn't elegant, but it did work. I used very light cuts, frequent measurements, and lots of test fittings. Eventually, I had a bushing that *just barely* slid into the slide. After dressing the little nub thingy with a file, I could even turn the bushing into place with a wrench. At this point, you may be tempted to call the bushing finished. But it isn't. The barrel needs to be held by the bushing in the front and lugs in the back without any torque, or 'springing' on the barrel. Fortunately for me, my barrel popped into place with no sign of 'springing.' The final step, for me, was to reshape the front edge bevel--from 45 degree straight bevel cut to soft curves--and then to polish it. Succesively finer grits of oiled wet-or-dry paper from 300 to 1200, then a couple minutes at the buffing wheel completed the job. Once finished and installed into the pistol, it was range test time. I'm happy to report a 25% improvement in group size with my CBOB. I seriously doubt I would have seen this much improvement if I had opted to try a "drop-in" bushing. The old and new link. Notice the contour difference:  Here's how I held the bushing for the exterior cuts--this was a later recreation, and you can see I didn't get it flat on the chuck. That would've been disastrous if I tried to cut it that way:  Then, finally, here's the new thick flange melt contour bushing installed. You can see that I paired it with a cut-down long-nose Wilson Combat plug: 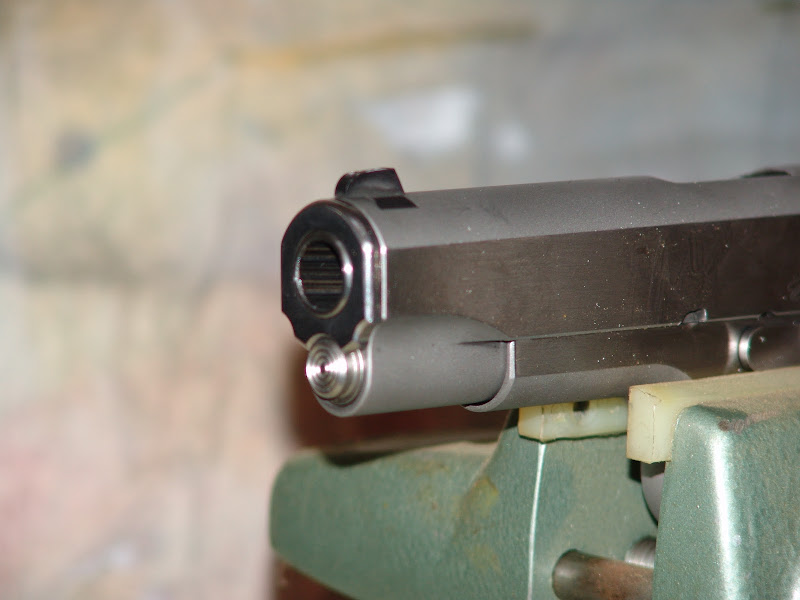

|
|
#2
12-31-2011, 05:05 PM
|
|||||
|
|||||
|
If I'da tried that, my pistol would be a handy club. That's why I let Wilson do the work. I'm envious of folks like you who have the skill and patience..good job
__________________
NRA Life Member Wilson Combat CQB Kimber Tactical Pro II S&W J-Frame .38 ect " I don't own the clothes I'm wearin', and the road goes on forever "  There's a gator in the bushes, and it's calling my name... COTEP #523
|
|
#3
01-01-2012, 12:55 AM
|
|||||
|
|||||
|
Tis cool to have the tools isn`t it. Thanks for the pic and the cool lathe idea. I would never thought of that one.
 I used my lathe to dress the inside of my EGW bushing for my Gold Cup but ordered the bushing to fit the slide dimension. I also installed an oversize slide stop to eliminate some play and it`s tighter than a disbursing officer the day before payday. Love the detail drawings in your pics, may I ask your source? Now, if I only had a mill...  Slim 
__________________
Retired Navy Chief and 1911 junkie.  CBOB 0553
|
|
#4
01-01-2012, 10:58 AM
|
|||||
|
|||||
|
It is nice to have tools, and even nicer to have a rudimentary idea how to use them (and that's really all I have...one of these days I should take a class or two at the local community college). I just don't *not* do things because I've never done them before. There's something seductive about thinking, "How hard can it be?" Gets me into trouble all the time.
Quote:
I have collected several sets of drawings and many individual images of detail drawings from across the interwebs for a 60% frame project I'm dabbling with. Here are the three complete blueprint sets I have: https://docs.google.com/open?id=0BxL...E5NTdjZTdkN2Rk https://docs.google.com/open?id=0BxL...E0YTQyYzExMTVk https://docs.google.com/open?id=0BxL...ZjNjJlNzRiZThi As for a mill...here's the cute little serious machine I found. It's a "Benchmaster" made in 1942 in Los Angeles. It's small, but it does real work. 
|
|
#6
01-01-2012, 12:27 PM
|
|||||
|
|||||
|
Thank you Randall, The most complete drawings I have seen since the 60's when I had access to the Technical Library on the sub tender.
Love your mill too, I'm (jealous) trying to justify buying one but... I have an old heavy/accurate drill press I inherited from my father-in-law and a Harbor freight x-y vise I'm using for rough work. It works as long as I'm patient but a real mill, well I may just have to go find one.  I have talked myself into (trying) doing a lot of things that have added to my experience in many things. Had I not tried many of the things I did, I would be a richer un-educatied old fart watching daytime tv in my recliner. THAT would drive me crazy. My lack of knowledge is no obstacle either. Happy New Year. Shoot safe and may all your shots be in the 10 ring. /s
__________________
Retired Navy Chief and 1911 junkie. CBOB 0553
|
|
#7
01-01-2012, 05:36 PM
|
|||||
|
|||||
|
Quote:
Have a great new year.
|


 Linear Mode
